If you are looking for information about how to update the firmware of your FreeDSM, please check the upgrade procedure.
ESP32C3-CORE initial flashing
The FreeDSM is based on Tasmota IoT free software. It is possible to flash the device before the complete assembly ... or after that, but inside the chassis, the "Boot" button is not so accesible (trick: you can use "Left" in joystick, it behaves as "Boot").
To perform these processes, espfuse and esptool are needed. They are available as Python or compiled for different OS:
Please note that, since this initial flashing, all subsequent upgrades can be performed through the Tasmota web interface.
Firmware and script files are available at the main page of this wiki: firmware-releases
NOTE: Replace the COM99 port with the one detected in your computer, connected to the ESP32.
1 Enabling screen backlight
To enable the Air101 screen backlight, it is needed to "free" the GPIO11 (theorically reserved to provide power to the flash, but the ESP32C3-CORE board provides 3.3V power directly).
Connect the USB-C cable to your computer and push the "Boot" button (around 1 second) of the ESP32 board.
From command line, execute:
espefuse -p COM99 burn_efuse VDD_SPI_AS_GPIO 1and confirm the efuse burn (not reversible process) writing "BURN"
2 Flashing the ESP32C3-CORE board
Connect the USB-C cable to your computer and push the "Boot" button (around 1 second) of the ESP32 board after the execution of the command:
esptool.exe --chip esp32-c3 --port COM99 --baud 921600 write_flash -fs 4MB -fm dio --erase-all 0x0 .\firmware.factory.binIf the display is connected, you can use joystick "Left" (GPIO9 - "Boot").
After the flashing, your FreeDSM should boot for the first time. To perform the first configuration, follow the instructions here: Configuration
Later ESP32C3-CORE web upgrades procedure
The up-to-date firmware.bin and autoexec.bec to perform the upgrade of your FreeDSM are available here. The FreeDSM will keep its current configuration after the upgrade.
The first two digits of the Berry script and the firmware must match (for example, Berry script 2.4.7 is compatible with Firmware 2.4). You can check this version information in the main web page of your FreeDSM or in the Settings menu.
To perform the update, access to the web interface of your FreeDSM (you can check the IP address in your router or, physically, access to the configuration option of the device, "AP information" will tell you the IP on the LCD screen).
- First, remove the old Berry script (file autoexec.bec): Main Screen, selecting "Consoles" or "Tools" -> "Manage File System" you will see this screen:
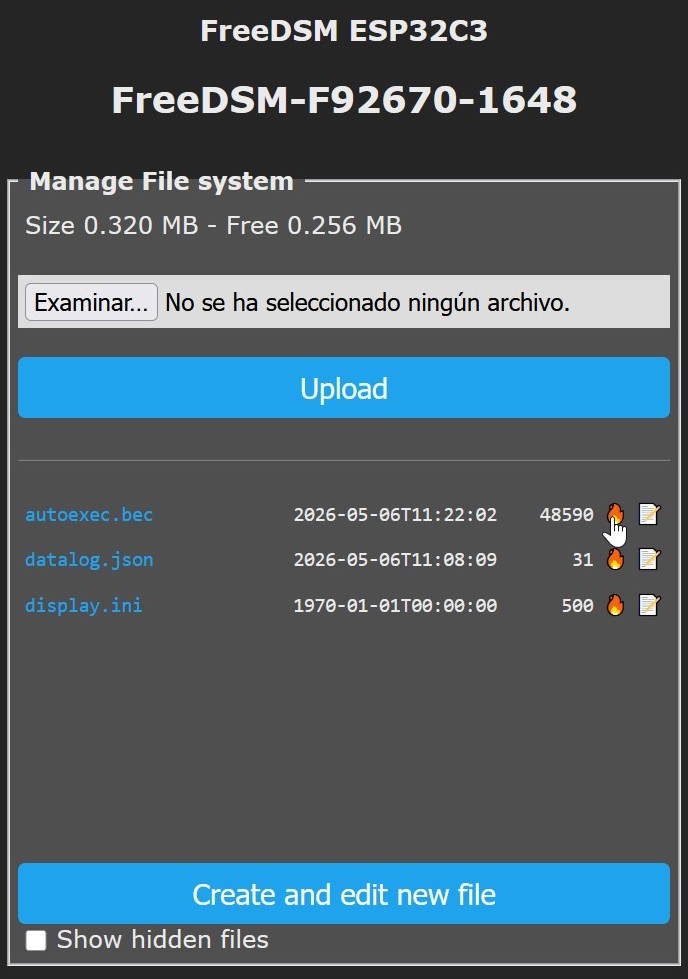
Click on the fire icon next to the autoexec.bec file.
- Second, firmware (file firmware.bin): Main Screen, select "Firmware Upgrade" and you will see this screen:
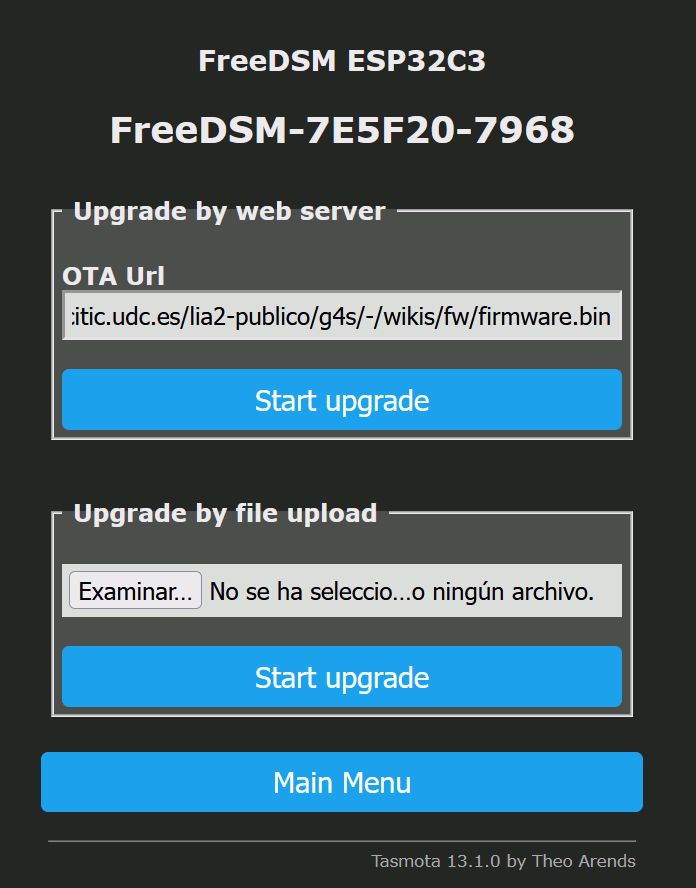
It is possible to update by OTA (check that the url is: https://gitlab.citic.udc.es/lia2-publico/g4s/-/wikis/fw/firmware.bin) but it is also possible to proceed with the previously downloaded "firmware.bin" from this page and proceed with "Upgrade by file upload" and later pressing "Start upgrade". It will take around 2 minutes. You will see the main screen on web first with SAFEBOOT in red and later without it, showing the firmware version.
If something fails and the FreeDSM stays in SAFEBOOT mode (shown in red on the web interface), simply repeat the process for the firmware flashing. Check that you are using the correct firmware.bin, downloaded from this page.
- Second, upload the new Berry script (file autoexec.bec): Main Screen, selecting "Consoles" or "Tools" -> "Manage File System" (the same used for the first step), select the new "autoexec.bec" using the upper left button and select "Start upload".
In the main menu, select "Restart". The FreeDSM will reboot and you will see the new version informationin the main screen (remember, firmware and script must match in the first two numbers of the version).